
Let’s be real: building a house foundation isn’t exactly glamorous. You won’t find us posting #FoundationSelfies on Instagram. But here’s the thing—if you mess this part up, your dream Home could end up looking like the Leaning Tower of Pisa’s less charming cousin. At Golden Bay Foundation Builders, we’ve seen it all—the good, the bad, and the “how did they even pour concrete here?” So grab a coffee (or something stronger), and let’s walk through this step by step.
Step 1: Do Your Homework (Yes, Like High School, But With More Shovels)
Before you even think about breaking ground, you need a game plan. Skimping on prep work is like trying to bake a cake without flour—it’ll crumble. Here’s what you must nail first:
- Soil Testing: Soil isn’t just dirt. It’s the VIP guest at your foundation party. Clay? Sand? Rock? Each behaves differently. We’ve had clients swear their yard was “solid,” only to find out it’s basically a marshmallow farm. Pro tip: Hire a pro for this. (Or call us—we do this daily.)
- Permits & Codes: Local building codes aren’t suggestions. They’re the law. Forget this step, and you’ll be besties with your city’s inspector—and not in a fun way.
- Budgeting: Foundations cost anywhere from 4,000to4,000to25,000+. FYI, surprises will pop up. Add a 10% buffer unless you enjoy stress-crying in Home Depot’s lumber aisle.
Step 2: Pick Your Foundation Type (No, Not “Whatever’s Cheapest”)
Foundations come in flavors, like ice cream—but way less tasty. Here’s the scoop:
Slab-on-Grade:
- Best for: Warm climates (no freezing temps), tight budgets.
- Downsides: Plumbing repairs mean jackhammering your floor. Fun!
:
- Best for: Sloped lots, easy access to utilities.
- Downsides: Moisture issues if not vented properly. Ask us about the time we found a family of raccoons living in one.
Basement
:
- Best for: Cold climates, extra storage (or that secret man-cave you’ve been plotting).
- Downsides: Costs more, takes longer. But hey, bragging rights!
Foundation Types at a Glance
| Type | Cost Range | Ideal Climate | Pros & Cons |
|---|---|---|---|
| Slab-on-Grade | 4k–4k–12k | Warm | Affordable, quick / No storage |
| Crawl Space | 8k–8k–21k | Moderate | Accessible / Moisture risks |
| Basement | 18k–18k–30k+ | Cold | Extra space / Pricier, complex |
Still unsure? We’ve got a whole guide on choosing the right foundation type for your project.
Step 3: Clear & Level the Site (AKA: The “Why Is There a Boulder Here?” Phase)
Time to play archaeologist. Clear the land of debris, trees, and that weird garden gnome collection nobody claimed. Then:
- Mark the Layout: Use stakes and string to outline your foundation. Double-check measurements—this isn’t IKEA furniture.
- Excavate: Rent a mini excavator or grab a shovel (if you’re feeling masochistic). Depth depends on frost lines and foundation type. In colder areas, dig deeper than the frost line to avoid heaving.
- Level Like a Boss: Uneven ground = foundation cracks. Use a laser level for precision.
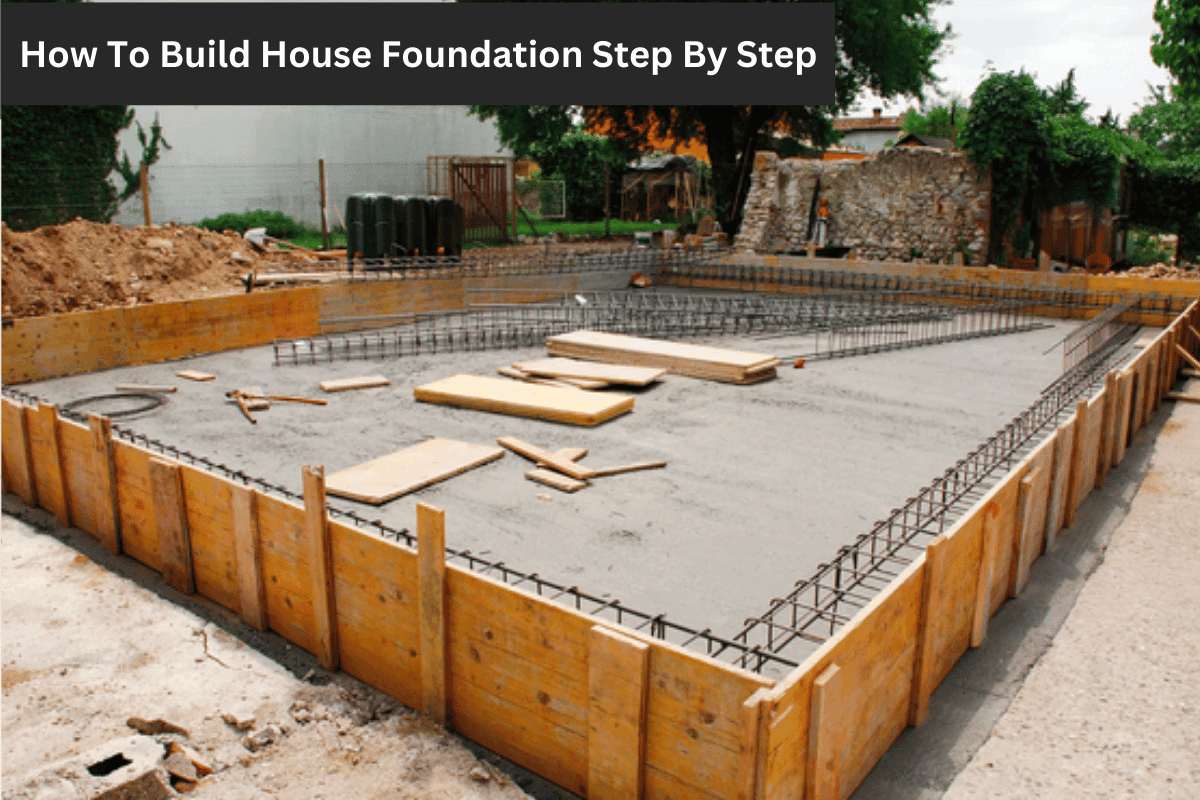
Step 4: Build the Footings (The Unsung Heroes)
Footings are the Beyoncé of your foundation—quietly doing the heavy lifting. Here’s how to get them right:
- Trench Digging: Dig trenches along your layout lines. Width depends on load-bearing needs (check local codes).
- Rebar Installation: Add steel rebar for strength. Skip this, and your foundation might audition for a role in Split.
- Pour Concrete: Mix, pour, and level. Let it cure for at least 48 hours. Patience, grasshopper.
Step 5: Construct the Foundation Walls (Channel Your Inner Bob the Builder)
Now for the walls. Materials matter:
- Concrete Blocks: Affordable but labor-intensive.
- Poured Concrete: Stronger, faster, but pricier. Our team at Golden Bay swears by this for durability.
- Insulated Concrete Forms (ICFs): Energy-efficient but costs more upfront.
Pro tip: Waterproof the exterior walls. Trust us—nobody wants a basement that doubles as a swimming pool.
Step 6: Install Drainage & Waterproofing (Because Moisture is the Enemy)
A soggy foundation is a sad foundation. Here’s your defense plan:
- French Drains: Redirect water away from the base.
- Vapor Barriers: Plastic sheeting under slabs or against walls.
- Grading: Slope the soil away from the foundation.
We’ve seen too many DIYers skip this step. Don’t be that person.
Step 7: Inspect, Inspect, Inspect (Seriously, Do It)
Get a third-party inspector to review your work. They’ll catch issues you missed (like that slightly crooked wall you’ve been gaslighting yourself about).
FAQ: Your Foundation Questions, Answered
How long does a foundation take to build?
Slabs take 1–2 weeks; basements can take 4–8 weeks. Delays happen—weather, inspections, that one missing permit.
Can I build a foundation myself?
Sure, if you’ve got skills, time, and a therapist on speed dial. Most folks hire pros (like us wink).
What’s the biggest foundation mistake?
Cutting corners on soil testing. Fixing a failed foundation costs way more than doing it right the first time.
Final Thoughts: Don’t Wing It—Call the Pros
Look, we get it. DIY projects are satisfying. But foundations? They’re the backbone of your home. One misstep, and you’re stuck with cracks, leaks, or worse. At Golden Bay Foundation Builders, we’ve been perfecting this craft for 15 years. Whether you need a hand with soil testing or a full basement build, we’ve got your back.
And hey—if you do attempt this solo? Send pics. We’ll either cheer you on or gently suggest a professional intervention.
Need more tips?
Check out our guides on common foundation mistakes and how to maintain your foundation.
Related Articles
Comprehensive Guide to Building Foundations: Types, Benefits, and Selection Tips
Essential Guide: When to Choose a Chain Wall Foundation for Your Home
Comprehensive Guide to House Foundation Types | Golden Bay Foundation Builders
People Also Ask
Building a foundation for a home is a critical process that begins with site evaluation and soil testing to determine load-bearing capacity. Excavation follows the building footprint, and footings are formed and poured below the frost line to prevent heaving. For many homes, a concrete stem wall or a monolithic slab is then constructed. The chosen system—whether a crawl space, full basement, or slab-on-grade—depends on climate, soil conditions, and project requirements. Proper drainage, waterproofing, and reinforcement are essential for long-term stability. For a detailed comparison of common systems, see our internal article Mat Foundation vs. Slab-on-Grade: Which Foundation is Right for Your Project?, which explores key differences and selection criteria to ensure your foundation matches the structural needs and site constraints of your project.
Whether $100,000 is enough to build a house depends heavily on location, size, and construction method. In many regions, this budget is considered tight for a traditional, contractor-built single-family home, where average costs can exceed $150,000 to $200,000 for a modest build. However, it can be feasible for a smaller home, such as a tiny house or a prefabricated kit, especially in areas with lower land and labor costs. Success requires meticulous planning, potentially acting as your own general contractor, and making cost-conscious material choices. Significant unexpected expenses are common, so a detailed budget with a contingency of at least 10-20% is essential to avoid overruns.
The cost to pour a 2000 sq ft foundation typically ranges from $16,000 to $40,000, with a national average around $25,000. This wide range is due to variables like foundation type, soil conditions, labor rates, and regional material costs. A basic slab-on-grade is often the most economical, while a full basement or a complex crawl space with piers will be at the higher end. Site preparation, including excavation and grading, also significantly impacts the final price. For a detailed breakdown of costs by foundation type and the factors that influence your specific project, we recommend reading our internal article How Much Does A 2000 Square Foot Foundation Cost?. Always obtain multiple quotes from licensed contractors for an accurate estimate.
When building a house, common mistakes often stem from inadequate planning and poor communication. A major error is not establishing a realistic budget with a significant contingency fund for unforeseen issues, leading to financial strain. Another is hiring contractors based solely on the lowest bid without thorough vetting of their references, licenses, and past work quality. Homeowners frequently regret skipping or rushing the design phase, which can result in impractical layouts or poor flow. Neglecting to secure proper permits or ignoring building codes can cause costly delays and legal problems. Finally, poor communication with your builder and not having detailed, written contracts for every aspect of the project are critical oversights that jeopardize timelines and outcomes.

